My Woodworking Projects
Welcome to my catalog of woodworking projects I have tackled. I put this together so I could remember the different projects I have built so far. I hope to keep updating this webpage as I create new woodworking projects and learn new skills. Enjoy!
Project Index, in reverse chronological order....kind
of (updated 12/25)
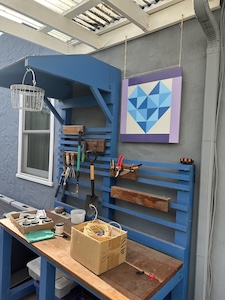
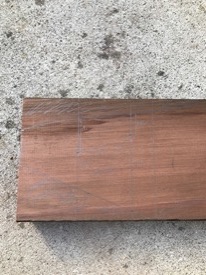
33. Assorted Picture Frames
32. Stand
Up Paddleboard
31. Bedroom
Dresser (in-progress => will get back to this one)
30. Potting
Bench (revisit)
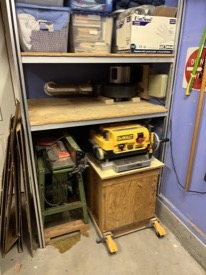
29. Dust
Collection
28. Kids Hammers (Halloween)
27. End-Grain Cutting Board
26. Seam
Clapper (x2)
25. Dovetail Box (with
router jig)
24. Arcade
Cabinet
23. Sewing
Machine Table
22. Potting Bench
21. Toy Crane
20. Kids Swords
19. Tensegrity
18. Plinko board
17. King Bed
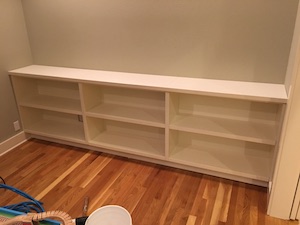
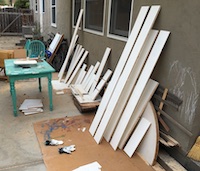
16. Built-In Cabinets
and Shelves
15. Outdoor Picnic Table
14. Hexagonal Fish
Tank Stand
13. Indoor Bench II
12. Indoor Bench (Shaver)
11. Garage Wood Storage
10. Seder Plate Box
9. Knife Block - add on
8. Mail Holder
7. Baby Cradle
6. Worktable on Wheels
5. Quilt Rack
4. Router Extension Table
3. Game Cabinet
2. Seed Planter Boxes
1. Garage Bench
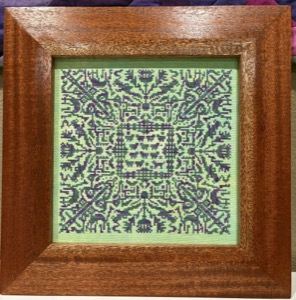
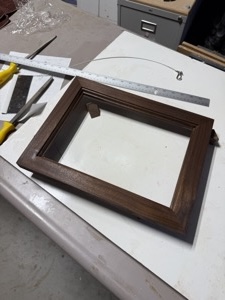
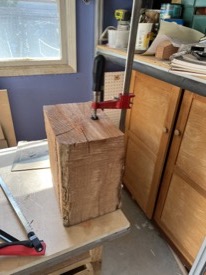
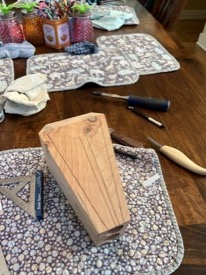
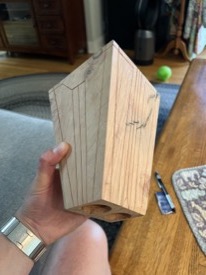
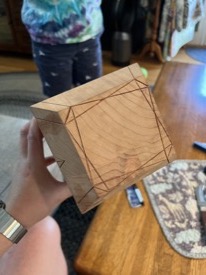
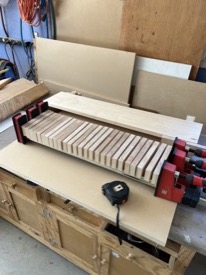
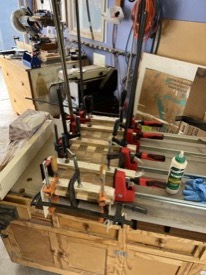
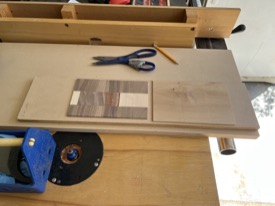
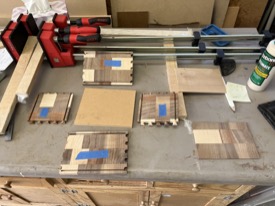
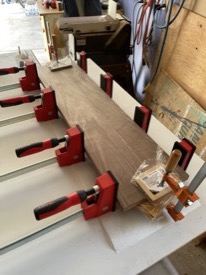
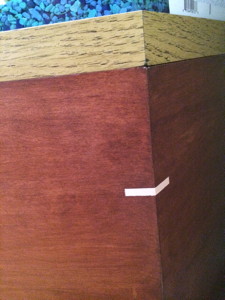
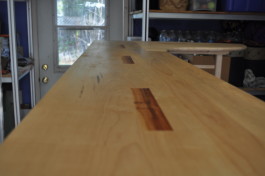
Assorted Picture
Frames
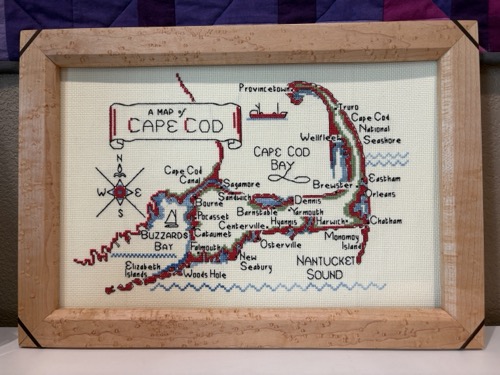 Time of build: 2025
Built for: You know who....
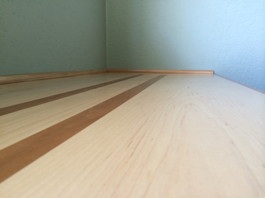
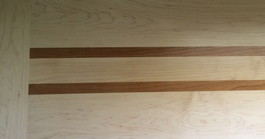
Wood used: Walnut, Birdseye maple, Mahogany
Description: I was tricked on these!! Someone I love very much started hinting they needed to buy some frames for her cross-stitches and needed to spend some amount of money sooner than later. My frugality stepped in and I said I could make some frames.
I did the first one out of Paulownia (left over wood from the SUP and not pictured below) just to make sure I could do it and remember a process. I tried to pass that one off as a real frame but it didn't
 pass the test from
the final customer. Since I don't like doing the same
thing over and over again, I ended up making three different
frames out of 3 different types of wood with 3 different
designs. They all generally turned out ok and I learned
(re-learned) some techniques along the way.
pass the test from
the final customer. Since I don't like doing the same
thing over and over again, I ended up making three different
frames out of 3 different types of wood with 3 different
designs. They all generally turned out ok and I learned
(re-learned) some techniques along the way.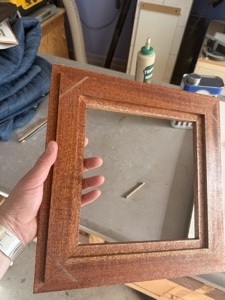

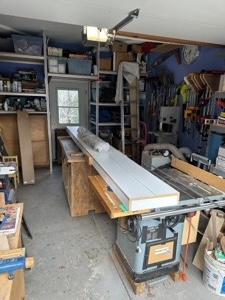
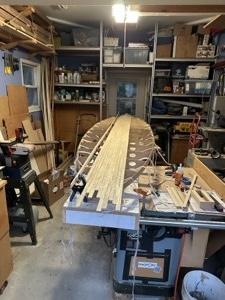
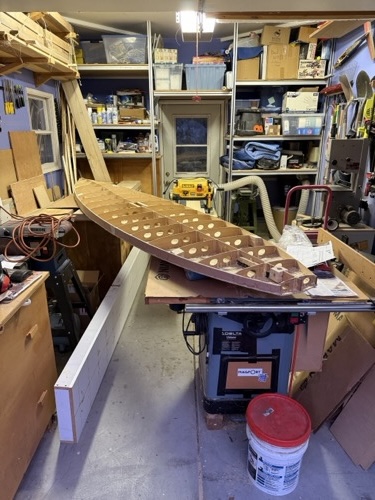
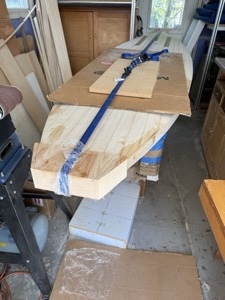
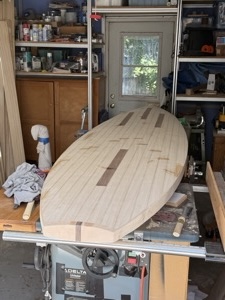
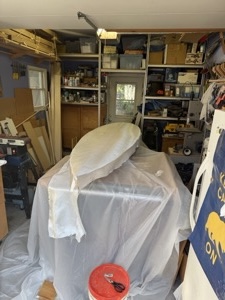
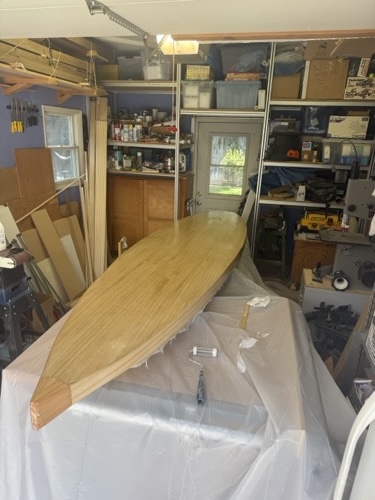
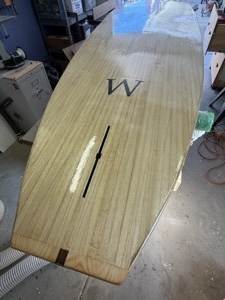
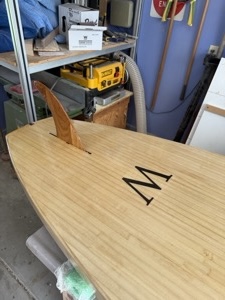
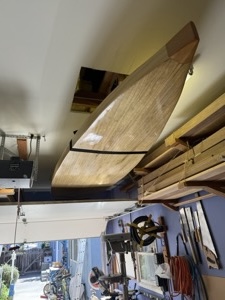
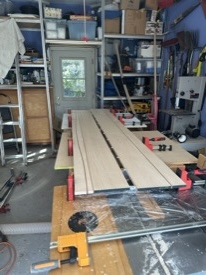
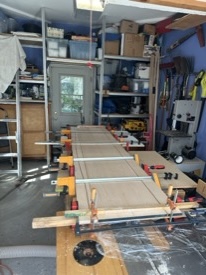
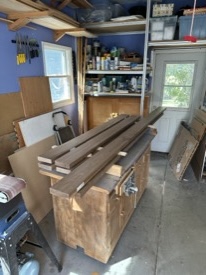
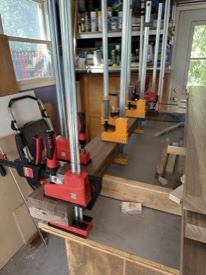
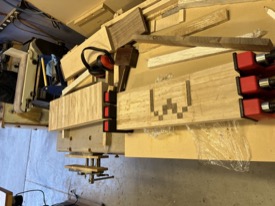
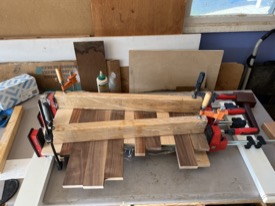
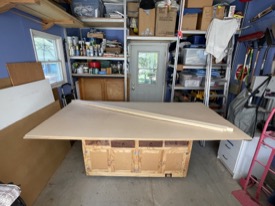
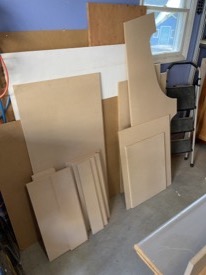
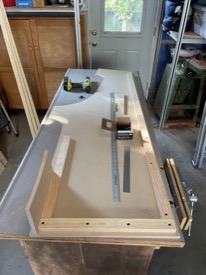
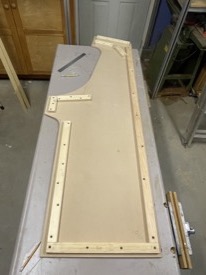
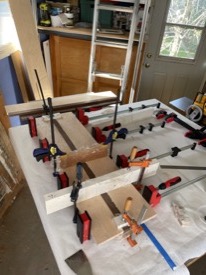
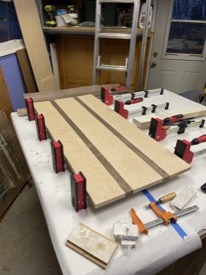
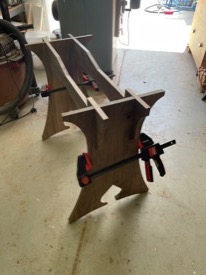
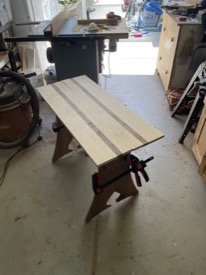
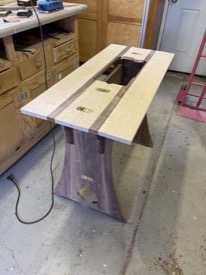
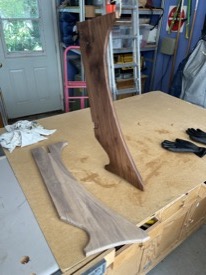
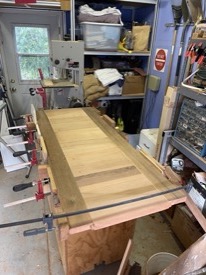
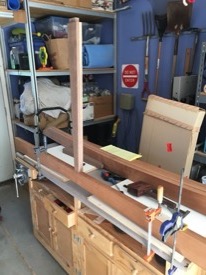
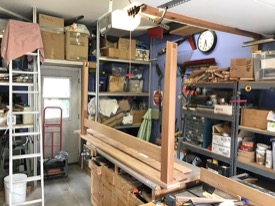
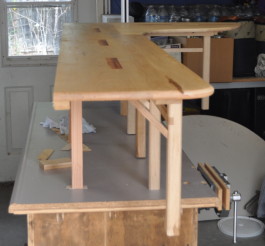
Stand Up PaddleBoard
Time of build: 2024-25
(still in progress)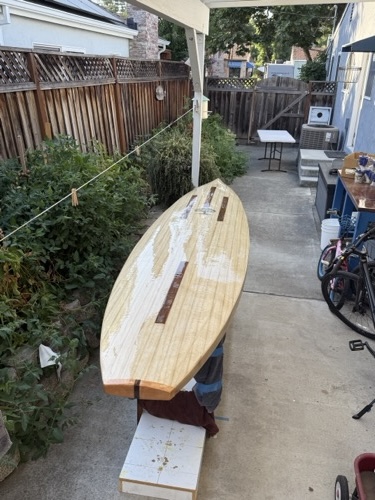 Built for: fun!
Wood used: Paulownia, Cedar, Walnut
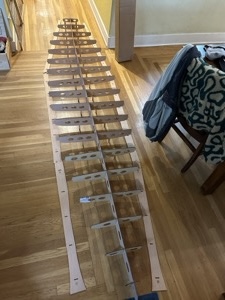
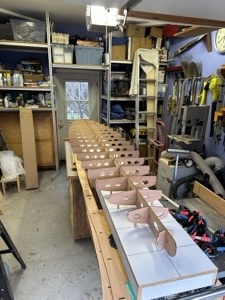
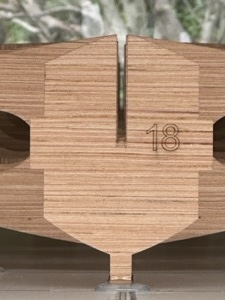
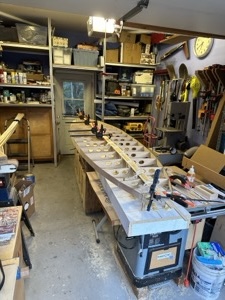
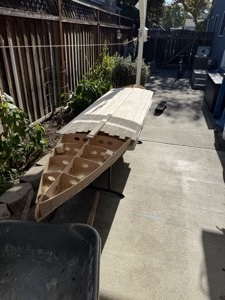
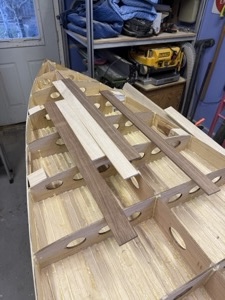
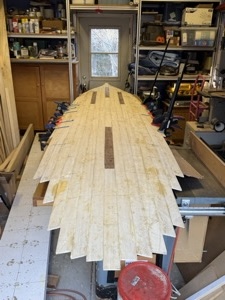
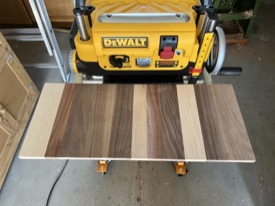
Description: This one was an interesting build and taught me things I have never done before including working with Paulownia, cutting consistent thin strips (of sort of consistent thickness), strip planking, using mostly gorilla glue for a build, working with fiberglass and epoxy, and a whole bunch of other things I have probably now forgotten. This build started mainly because I went to a Christmas party and met another wood worker (also named Dave). He was building mainly boats and I mentioned the closest thing I have come to water recently was going out on a stand up paddleboard in Hawaii (so far now I have done it twice). He recently came across a site that sold patterns/kits for Stand Up Paddleboards (SUPs) and he pointed me in that direction and said it didn't look too hard and could be fun. So I went to Jarvis Boards and purchased this SUP touring kit. The kit came and I was able to assemble it pretty quick (the kit is the inside frame structure of the SUP....precision cut from thin plywood).
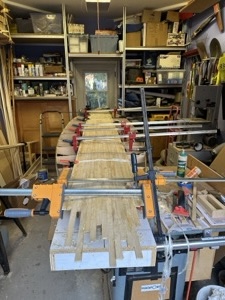
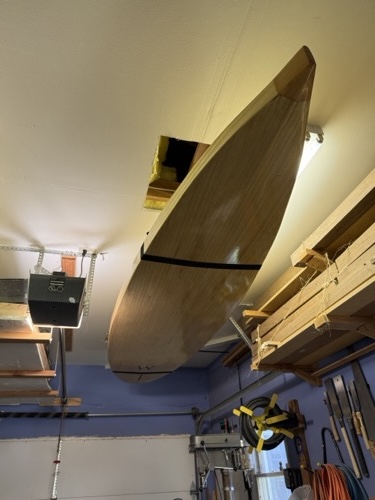 I could write a whole bunch on
this project as it took me on and off ~1.5 years.
Definitely a project I left alone in the garage and came back
to on and off. The garage is definitely not big enough
to have the SUP in it and do any cutting/woodworking.
Either I need to get a bigger garage or never do one of these
again. Overall super fun. I finished this around
September of 2025 and figured out a way to store it on a
pulley system hanging from the garage. It takes a bit of
work to get it up and down, but I am pretty pleased with the
build and where it is stored (as I get to look at it everytime
I go to the garage). Shout out to Chuck Jenkins at Jenkins Boat
Works for doing a video series on his build that helped
out quite a bit!
I could write a whole bunch on
this project as it took me on and off ~1.5 years.
Definitely a project I left alone in the garage and came back
to on and off. The garage is definitely not big enough
to have the SUP in it and do any cutting/woodworking.
Either I need to get a bigger garage or never do one of these
again. Overall super fun. I finished this around
September of 2025 and figured out a way to store it on a
pulley system hanging from the garage. It takes a bit of
work to get it up and down, but I am pretty pleased with the
build and where it is stored (as I get to look at it everytime
I go to the garage). Shout out to Chuck Jenkins at Jenkins Boat
Works for doing a video series on his build that helped
out quite a bit! ALSO...including a video of the thin strip jig I made (found it somewhere online)...it works great!
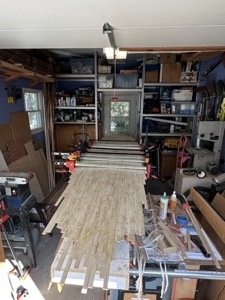
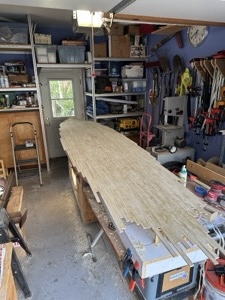
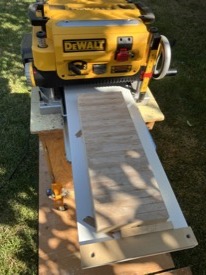
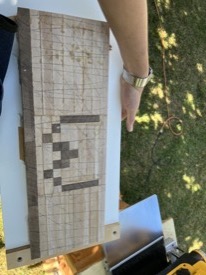
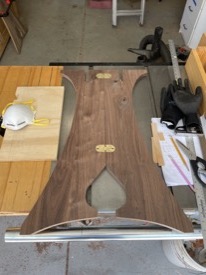
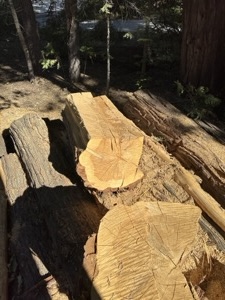 One fun part of this
 project was my dad and I cut a
large chunk of Cedar from a cut down tree in Shaver lake with
a chain saw and I was able to use those pieces as the nose and
tail pieces. I also created (thanks Gen AI) a tree of
life picture and printed it on some rice paper as a decal
graphic for the top of the board. For the bottom of the board,
I printed the letter W. The bottom of the board had
~3/4" wide strips (that was a lot of gluing) and the top I
used 2-1/2" strips to not have to spend such a long time
during the glue up process. I actually like the look of
the more narrow strips, but the overall board came together
and I like it a lot.
project was my dad and I cut a
large chunk of Cedar from a cut down tree in Shaver lake with
a chain saw and I was able to use those pieces as the nose and
tail pieces. I also created (thanks Gen AI) a tree of
life picture and printed it on some rice paper as a decal
graphic for the top of the board. For the bottom of the board,
I printed the letter W. The bottom of the board had
~3/4" wide strips (that was a lot of gluing) and the top I
used 2-1/2" strips to not have to spend such a long time
during the glue up process. I actually like the look of
the more narrow strips, but the overall board came together
and I like it a lot.


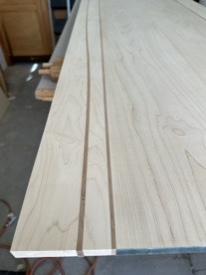
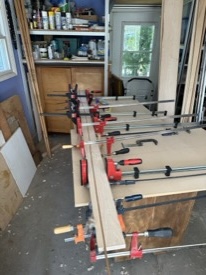
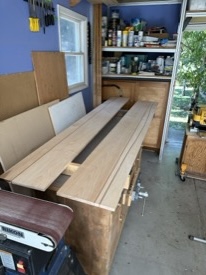
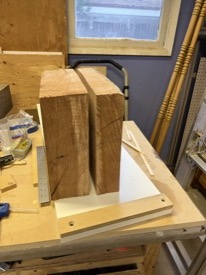
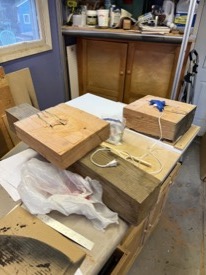
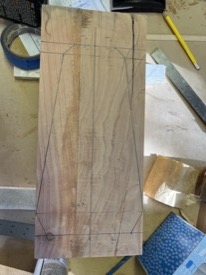
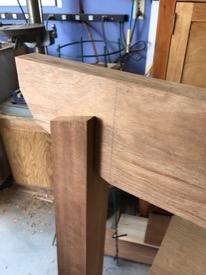
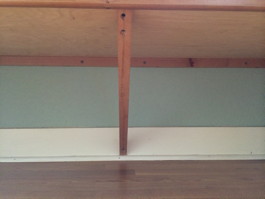
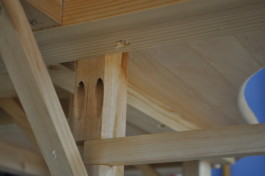
Bedroom Dresser
Time of build: 2024-2?
(still in progress)
Built for: The Master Bedroom
Wood used: Maple, Walnut, Cherry
Description: We have always wanted a nicer dresser in our bedroom and I thought I was finally in a place to tackle this project. Tried to draw something up in CAD to get a better feel for dimensions and wood coloring.
 I
haven't made much progress on this to be honest. Bought some
walnut, made some glue ups to create 3x3 posts that I plan to
use as the legs. The current top I put together was from
some maple I had...and for fun I put a curvy piece of cherry
between some of the panels. Right now the whole thing is
'stored' in the garage until the Stand Up PaddleBoard project
is completed
I
haven't made much progress on this to be honest. Bought some
walnut, made some glue ups to create 3x3 posts that I plan to
use as the legs. The current top I put together was from
some maple I had...and for fun I put a curvy piece of cherry
between some of the panels. Right now the whole thing is
'stored' in the garage until the Stand Up PaddleBoard project
is completed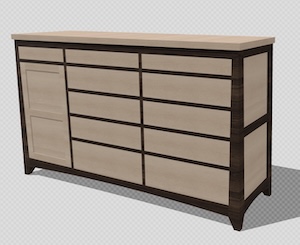
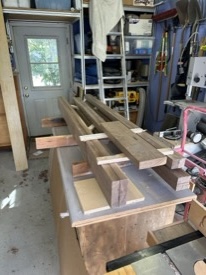
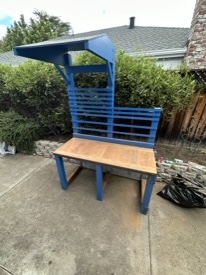
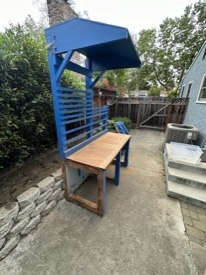
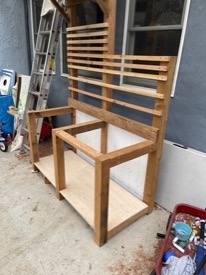
Potting Bench
(revisit)
Time of build: 2023
(revisited from 2020)Built for: Extra space in the garden
Wood used: N/A
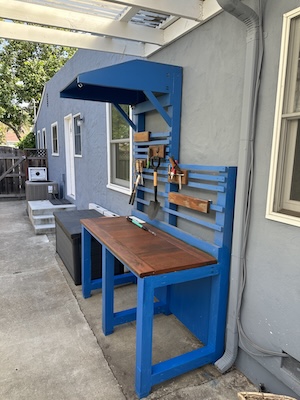
Description: So the original potting bench didn't seem 100% water proof and the 'inside' area was getting wet and damp. After taking everything out and looking at the inside in more detail...it was obvious that the 'reclaimed' materials I used for the doors, sides, and bottom were not outdoor materials intended to handle the elements. So we decided to remove the bottom completely and just leave it open to the air. We also moved the potting bench to be more underneath an overhang (further protecting it from the elements) which opened up the location it was previously at for an all purpose plastic storage bin.
Overall still glad I made the potting bench. The top does keep cracking. Maybe someday I will re-finish it and put a coat of epoxy on it. I was playing around with some epoxy from the Stand Up Paddle board build and seems like that could really protect the potting bench top from the elements.
Dust Collection
Time of build: 2022-23Built for: The Woodshop (and my lungs)
Wood used: Scrap wood, and hardware bought from
 home-depot and online
Description: I finally got around to installing a dust collection system...but I didn't want it to take up much floor space in the garage. I ended up buying a Harbor Freight system and added in an Oneida chip collector to make the system a two-stage style system. I installed the blower on one of the garage shelves and vented it outside (so no bag/filter needed). One cool thing is I stumbled across these 'magport' connectors which are really cool and work out well for my shop. So I have one hose for the dust collection system that can 'e
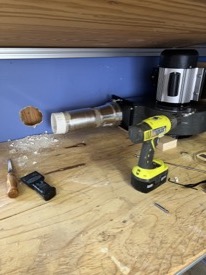 asily'
attach to many of the tools in the garage via the magnetic
connectors.
asily'
attach to many of the tools in the garage via the magnetic
connectors.Still futzing around with some of the tools/connections like the table saw (which required me to seal it up for dust collection and attach a magport. Definitely a fun project to get the garage setup (and another opportunity to clean things up). Hopefully will be done soon and can move onto the next project!
[2024] - the dust collection system works 'ok'. Definitely best for the planar (making it so I can use the planar in the garage)...although the planar fills up the dust collection pretty quick! I also tried to close up the table saw and I am not sure the dust collection makes much difference at this point. To make it really work I would need to add in an 'over the saw' collection...but I just don't want to. Overall I am glad I did it, but I still wear a mask in the garage. It is nice to have a quick vacuum system to clean up the floors though!
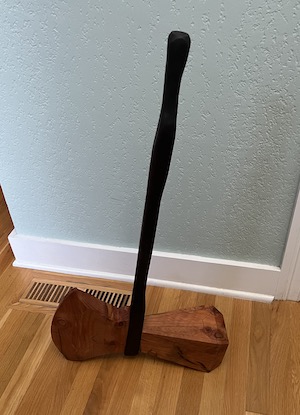
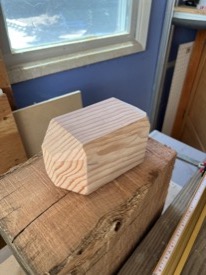
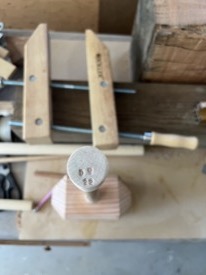
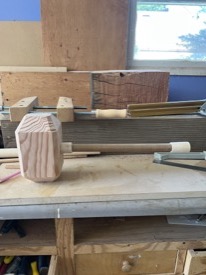
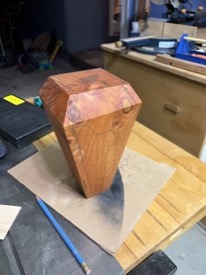
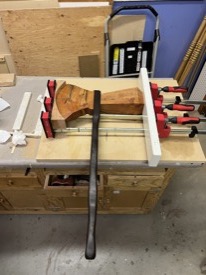
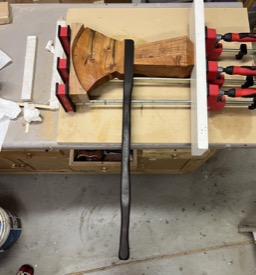
Kids Hammers
(Halloween)
Time of build: 2022Built for: The kids
Wood used: A leftover 6x6 beam from Shaver lake and a large chunk of red cedar my dad cut off from a stump of a previously fallen tree (also in Shaver lake). And one piece of oak that was also cut down in Shaver lake (for the handle).
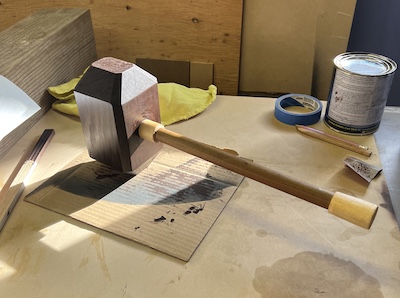
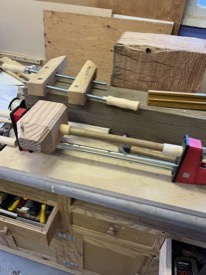
Description: This one was also quite fun as it was for the kids. Originally (after a fun disneyland trip), my daughter decided she wanted to be Thor for halloween and we splurged and bought her a Thor costume. So obviously she needed a hammer. I thought it would be a quick build. My son (who wanted to help) and I found some pictures online of Mjolnir to help with some rough dimensions. The cuts were kind of tricky on the table saw as I had to construct a jig to make the cuts and the table saw blade wasn't quite big enough to make some of the cuts in one pass. To make things 'easy' I ended up using two dowels I had lying around and did some
 careful
drilling to make one into a 'sleeve' for the other for the end
cap and where the dowel attached to the hammer. Stained
the head of the hammer with a gel java stain and I think it
really came out nice.
careful
drilling to make one into a 'sleeve' for the other for the end
cap and where the dowel attached to the hammer. Stained
the head of the hammer with a gel java stain and I think it
really came out nice.After the hammer was all done...that is when my son decided he ALSO wanted to be Thor for halloween. Two Thors!! Once again a costume was purchased...and the decision that he also needed something to carry. Instead of another hammer, we decided to make Storm Breaker. This one was a bit harder as we made both ends of Storm Breaker from a large chunk of red cedar and initially I had no way to cut it in the garage. Ended up cutting it by hand with a saw (Yikes...I need a bigger bandsaw :-)...or at least a better hand saw!).
I tried something a bit different by drawing and cutting grooves into the heads of the hammer in some designs and filling those grooves with wood filler to make a pattern. I think the effect came out real nice. Made the handle of storm breaker from an (originally) twisted piece of oak. Stained the handle with the gel java stain and the rest with some BLO (I think...).
What a fun build and both kids got to be Thor!


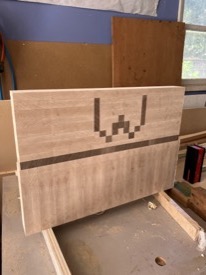
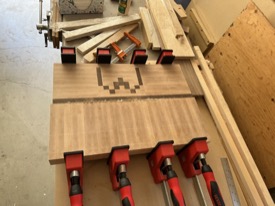
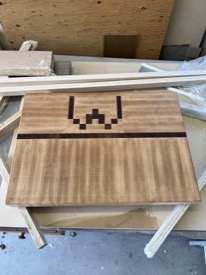
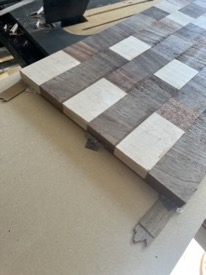
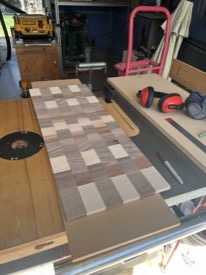
End-Grain Cutting
Board
Time of build: 2022Built for: The family and our house
Wood used: Maple and Walnut, mostly scraps (although I think I did use a board of maple I had stored away in the garage from Southern Lumber...and they closed in 2015)
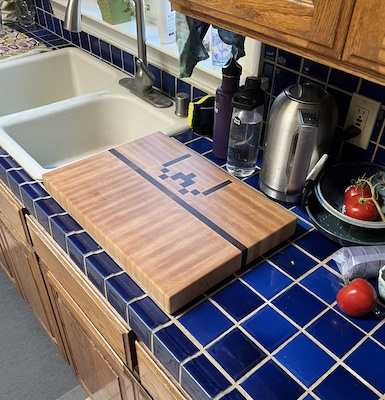
Description: This one was fun for a few reasons. First...it was my first cutting board (ever), and that feels like something I should have made awhile ago. Second, my son helped design the pattern for the 'W' and then my wife gave it the thumbs up on the placement.
I created the solid maple piece first at the bottom and then the 'W' second as that was still trying to figure out the process. I originally thought I would hand plane this monstrosity down as I had read some of the dangers of planing end-grain on the thickness planer. But after reading some other articles, I decided to go for it and luckily no disaster. Definitely chose the slowest setting and took really really really shallow passes. I was fairly pleased that the top and bottom pieces (separately through the planer) glued up together fairly easily without needing much more sanding/planing on the final piece.
It is definitely heavy and I had to add some slight shim and cut things away to get it all to come together. I continued to learn patience with the many glue-ups that contributed to this cutting board. We currently use it in the kitchen. There were two areas that started to split near the edges, but I added some more glue and clamped them together and for over a year the cutting board is still going strong!


Seam Clapper (x2)
Time of build: 2022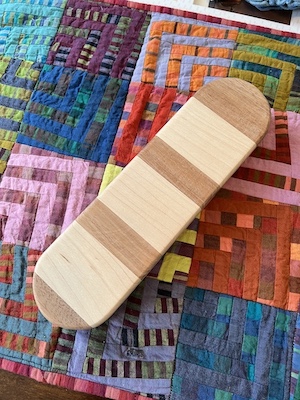 Built for: The
wife....and then another for an auction supporting the quilt
guild the wife is a part of
Built for: The
wife....and then another for an auction supporting the quilt
guild the wife is a part ofWood used: All scraps (birds-eye maple and mahogany)
Description: Did anyone know what a seam clapper is? Answer....yes, if you work with fabric. From the internet..."It works by absorbing the steam applied to a seam, and locking in the heat. As you press down on the seam with the clapper, the pressure sets the seam flat as the fabric cools."
After I made one for the wife, she asked me to make another one for a quilt auction at one of her retreats! Can't seem to find a picture of the second one..but I think our neighbor, who is in the same quilt guild with my wife, won it!!

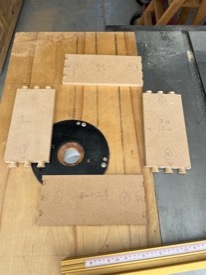
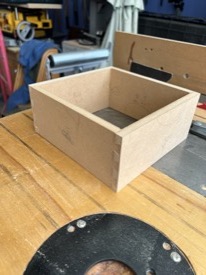
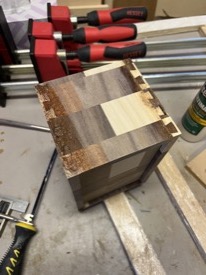
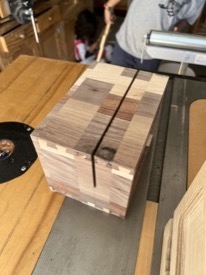
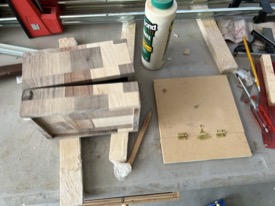
Dovetail Box
(with router jig)
Time of build: 2022Built for: Not really sure (there is a story behind this one...you have to ask in person :-))
Wood used: Scrap wood....maple, cherry, mahogany
Description: This was a 'fun' project to try to see how well the dovetail jig I inherited worked (FYI...not well). I could never get the
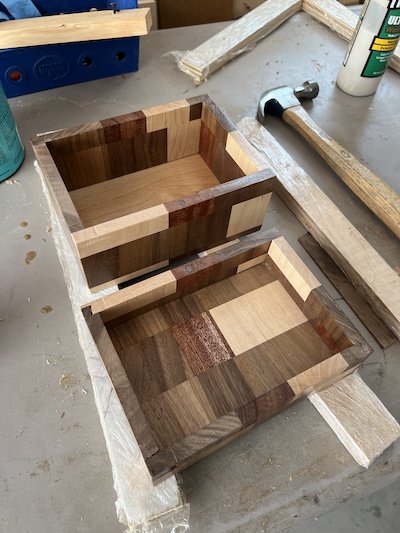 dovetail jig to work perfectly...although I
will say I tried with multiple blanks and test pieces.
Maybe I just need to keep trying, but even when I thought I
had it dialed in, the subsequent cuts changed just enough
where I had to try a few things to fill the dovetail joints
that didn't perfectly line up. Definitely learned a few things
including on the planer (and made a planer sled during this
project) and some more practice on glue-ups and router work.
dovetail jig to work perfectly...although I
will say I tried with multiple blanks and test pieces.
Maybe I just need to keep trying, but even when I thought I
had it dialed in, the subsequent cuts changed just enough
where I had to try a few things to fill the dovetail joints
that didn't perfectly line up. Definitely learned a few things
including on the planer (and made a planer sled during this
project) and some more practice on glue-ups and router work.I tried to plane a fairly thin piece of wood (already glued up piece) and almost had an issue with the planar after it ate one of my pieces. Overall a fun project..but probably won't be using that router jig again.
One nice outcome is my wife got a new box for holding recipe cards!

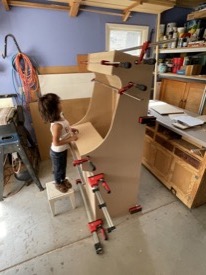
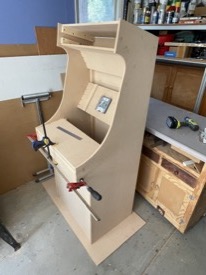
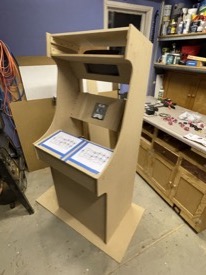
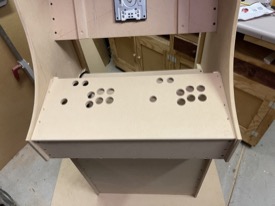
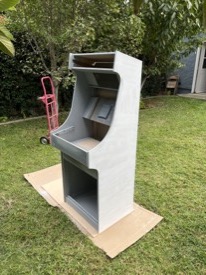
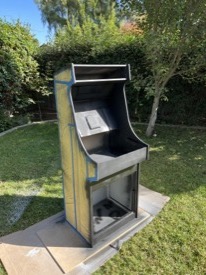
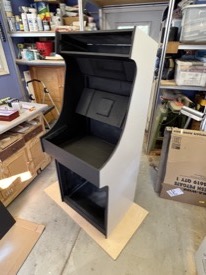
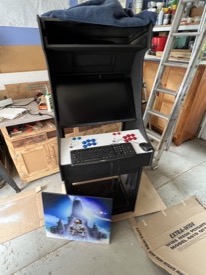
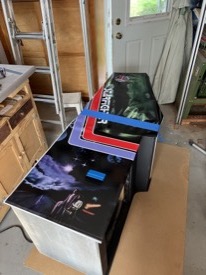
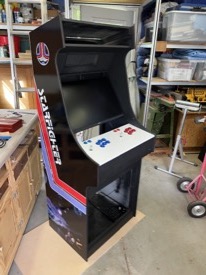
Arcade Cabinet
Time of build: 2021Built for: The kids...but also for me :-)
Wood used: MDF
Description: I saw someone had built a full size arcade cabinet recently and thought...I could do that (maybe...). After doing some research, I found a few sites describing using a Raspberry Pi to
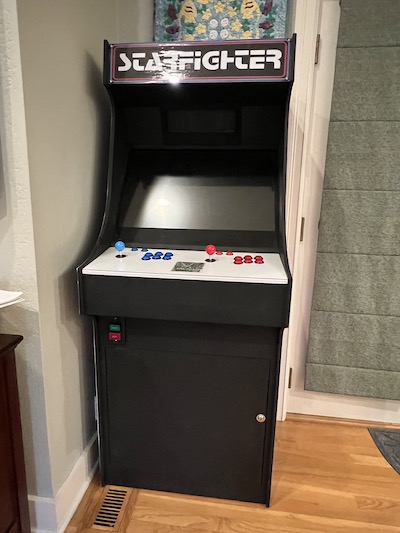 power a MAME or FBA. I could write a
whole bunch about my fun trials to get something up and
running...but I did it! Using RetroPie and some
controllers purchased online. I did buy a screen and got
it installed in the arcade cabinet...and then in one of the
transitions the screen cracked...so I had to buy the exact
same screen as I had already installed the mountings for that
model I found an old bose speaker and custom
mounted that in the top of the cabinet.
power a MAME or FBA. I could write a
whole bunch about my fun trials to get something up and
running...but I did it! Using RetroPie and some
controllers purchased online. I did buy a screen and got
it installed in the arcade cabinet...and then in one of the
transitions the screen cracked...so I had to buy the exact
same screen as I had already installed the mountings for that
model I found an old bose speaker and custom
mounted that in the top of the cabinet.My experience with the templates and the router on the sewing machine table project helped out. I used some of the similar techniques to make sure the sides of the cabinet were the same (definitely a bit of lifting and maneuvering around on the router table...but it all worked out!).
Took awhile to settle on what the theme of the cabinet should look like. Settled on The Last Starfighter (a cool 80s movie). I found someone in England who had some arcade art that the printed out on vinyl and I applied the arcade. As an added exercise, I was able to get this version of last starfighter game (thank you roguesynapse) working using some funky PC emulation and patience. It is pretty cool to have it all working.


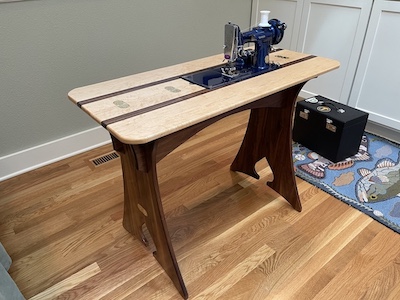
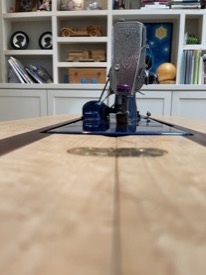
Sewing Machine Table
Time of build: 2021Built for: My Wife
Wood used: Birds-eye maple (Grampy's favorite) and mahogany
Description: After the potting bench and some solid garage clean up, I was looking to build something with a bit more finesse. About the same time, my wife came back from a sewing machine repair class
 (offered through the person who sold her a
refurbished sewing machine) and had a pattern for a knockdown
sewing machine table that fit an older Singer featherweight
sewing machine she recently purchased. The pattern was
fairly 'simple' (or so I thought) and the project was just
what I was looking for at the time.
(offered through the person who sold her a
refurbished sewing machine) and had a pattern for a knockdown
sewing machine table that fit an older Singer featherweight
sewing machine she recently purchased. The pattern was
fairly 'simple' (or so I thought) and the project was just
what I was looking for at the time.Got to make really great use of the band-saw and router. This was the first time (in earnest) that I made templates out of mdf and used the router (with some new router bits!!) to get 'perfectly' matching and symmetric legs. I also went out and bought a nice piece of birds-eye maple as my wife really wanted a piece that used that wood to remind her of her Grandfather (who was also a woodworker and used birds-eye maple regularly). For the legs I used some mahogany leftover from the bed project. Finished the project with BLO and (I think) a top coat of polyurethane.
Very fun project and it does disassemble into flat pieces. Still trying to find an easy 'carrying case' for it so that my wife can bring it to some quilting retreats. Not sure if that will ever happen as it is a bit heavy.


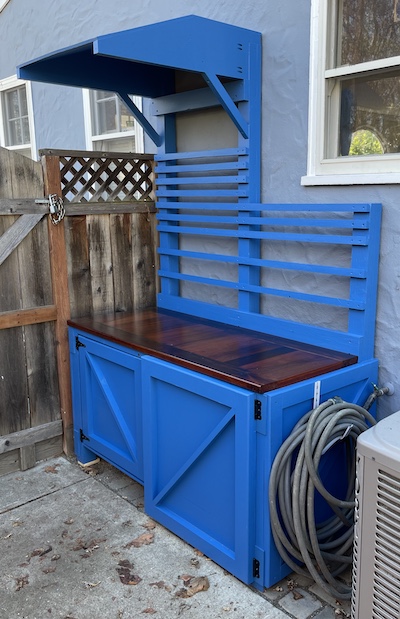
Potting Bench
Time of build: 2020Built for: The garden and the family
Wood used: All reclaimed wood (and scraps from other projects)....Really!!
Description: I am really proud of this project because it used only left-over wood and scraps from the garage. Got to clear out
 the garage of some
old 4x4 posts, the remaining redwood deck wood that was still
left over from the outdoor
picnic table, and even 2 doors we pulled off the house
when we moved in! I found a general plan online and
adapted it to fit the space under the kitchen window. I
had to dig up the area under the window and put some left over
pavers to make it 'flat' to start the entire project
off. My wife picked the color (we both thought the blue
would be a bit darker) and it looks great! I would love
to re-write history and say I planned to have two different
style doors to showcase something...but the truth is I forgot
to add the depth of the doors to my initial drawings and when
I put it all together the left door was blocking the
gate. Luckily the entire construction was put together
with screws (I tried out pocket screws) and I took the left
door apart and replaced it with one that was smaller and fit
inside the frame. The top is a glue-up of the leftover redwood
(barely had enough pieces to get it to size), finished with
multiple coats of Linseed Oil + Spar Urethane in different
proportions. Definitely a fun build and hopefully we
will get some good use out of it!
the garage of some
old 4x4 posts, the remaining redwood deck wood that was still
left over from the outdoor
picnic table, and even 2 doors we pulled off the house
when we moved in! I found a general plan online and
adapted it to fit the space under the kitchen window. I
had to dig up the area under the window and put some left over
pavers to make it 'flat' to start the entire project
off. My wife picked the color (we both thought the blue
would be a bit darker) and it looks great! I would love
to re-write history and say I planned to have two different
style doors to showcase something...but the truth is I forgot
to add the depth of the doors to my initial drawings and when
I put it all together the left door was blocking the
gate. Luckily the entire construction was put together
with screws (I tried out pocket screws) and I took the left
door apart and replaced it with one that was smaller and fit
inside the frame. The top is a glue-up of the leftover redwood
(barely had enough pieces to get it to size), finished with
multiple coats of Linseed Oil + Spar Urethane in different
proportions. Definitely a fun build and hopefully we
will get some good use out of it!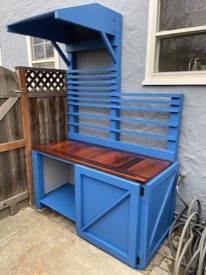

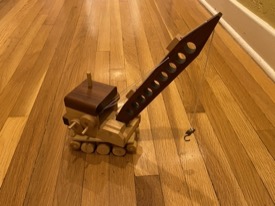
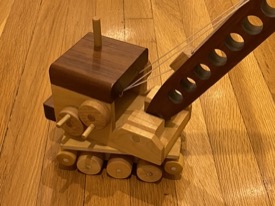
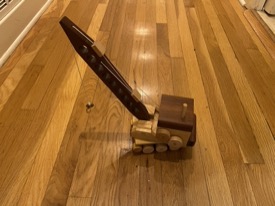
Toy Crane
Time of build: 2019?Built for: My Son!
Wood used: Maple, Poplar, and Ironwood
Description: I found this plan and it looked cool! My dad was building some wood toys near the same time and I thought I would try my hand at it with this crane. It was pretty fun and the knobs raise/lower the boom and the rope. I don't have a lathe so I cut the wheels using methods that were not super precise, but overall it came together and my son said he loved it. I would call this one a success given the customer was happy!
Kids Swords
Time of build: 2019?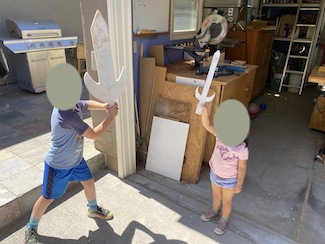
Built for: Fun!
Wood used: Plywood scraps
Description: My son is great at drawing and drew some sword outlines on some pieces of wood. We decided to use the bandsaw to cut them out and make some swords. Definitely a fun process and the kids love playing with the swords in the backyard. Sometime later the kids painted their swords....although I don't have any pictures!
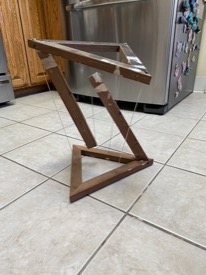
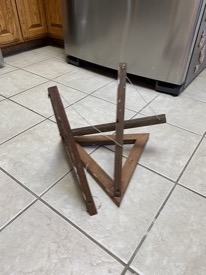
Tensegrity
Time of build: 2019?Built for: Fun!
Wood used: Scraps
Description: I saw this on some of the woodworking forums (e.g. tensegrity table). Thought it would be fun to build one out of scrap wood and see if it made sense to make something more 'fancy'. Definitely pretty cool, but haven't decided to make anything more for now.
Plinko Board
Time of build: 2017Built for: The Purim Carnival (temple preschool)
Wood used: Plywood
Description: A quick build for a pre-school sponsored event. Two pieces of plywood attached together with a hinge to make it "easy" to fold and transport. My dad was nice enough to turn the discs. Another volunteer was responsible for painting. Lots of individual dowel pegs cut, drilled, and glued in place. It has been awhile since the build, but I think I used a hand jigsaw to cut the curves on either side. Take a look at this video of it in action!
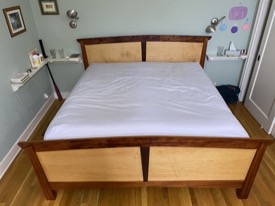
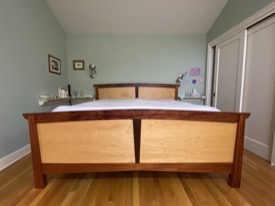
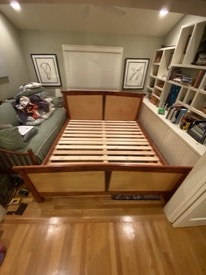
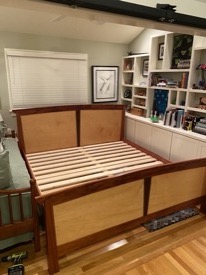
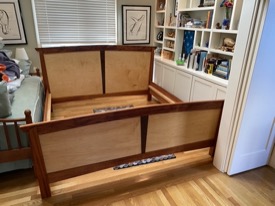
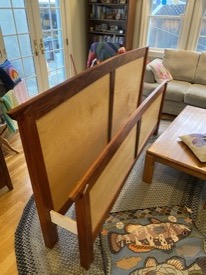
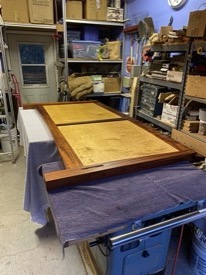
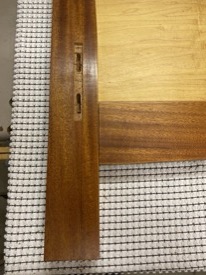
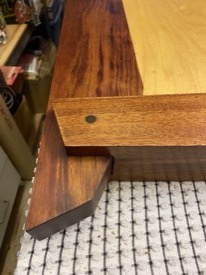
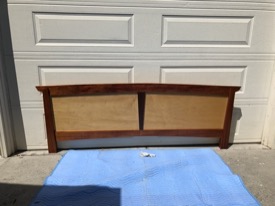
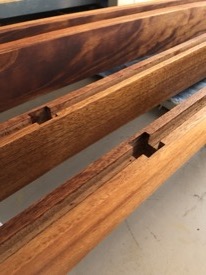
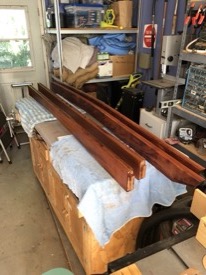
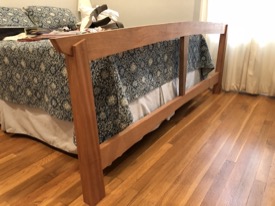
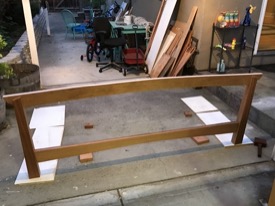
King Bed
Time of build:
2016-2020 (Yikes!! this one took awhile)Built for: My Wife (and me too!)
Wood used: Mahogany, Walnut, Maple (plywood)
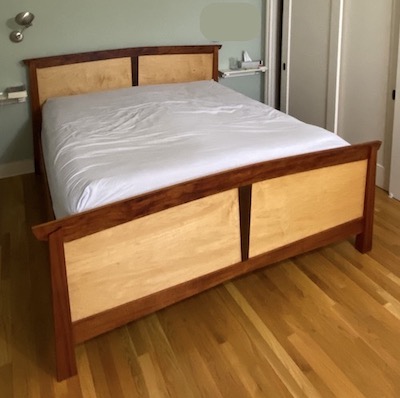
Description: This was definitely a labor of love (also of sweat, time, and much learning). My wife was interested in getting a headboard for our previous bed (circa 2016) to have a real 'adult' bed. I thought it was also time to try my hand at making a bed and said I could probably finish it up by the end of 2017 at the latest. Four years later....the 'decade of the bed' was over and we have been enjoying restful sleep ever since. I found some inspiration of the design from some pictures of online and decided to try making it my own. Several anecdotes throughout this build:
- Our local hard wood store went out of business and I bought a bunch of mahogany to help finish this project
- I originally thought of trying to use birds-eye maple veneer (in honor of Jenny's grandfather who used birds-eye maple in some of his woodworking projects) on the large panels (even bought some veneer and glue). But after some failed attempts with trying out the veneer process on smaller pieces and having not great looking results, I gave up and bought some nice maple plywood.
- The staining process was quite involved (I tried something from a Wood magazine). Essentially creating a slurry by sanding in the stain/finish with progressively increasing grit. I don't even remember the process at this point, but still have the magazine if I ever decide to go back to try it again. I think the final coat was some clear wax (Bison brand?).
- The bed took so long that there were several times when
I wrapped up all the pieces (at different stages and put
them away for several months at a time) just to make room
for other projects

Built In Cabinets and Shelves
Time of build: 2015-2016Built for: The House, Add on room
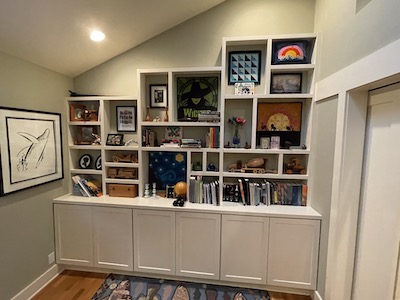
Wood used: Plywood and Wood easily painted
Description: We enclosed an outside patio area into an additional room for the house and we "commissioned" this built-in with my Dad. My wife drew out the shelving specific for hanging quilts and displaing some of the wood trucks my Dad had previously built. It has been awhile, but I recall my Dad came up and installed the base/cabinets that he had pre-built at his house. He also had cut out the top shelving pieces. Unfortunately time ran out and he got as far as he could before he had to go back home (sometime around Thanksgiving/Christmas). I was tasked with finishing it all up! It came together pretty quickly, but then filling in the gaps, painting, and making some custom pieces to fit the non-square walls of our house took some time. I really like the look of it and it really matches the room (particularly the barn doors that were installed by the contractor when the room was added to the house).
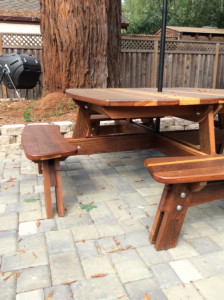
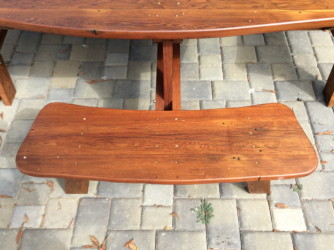
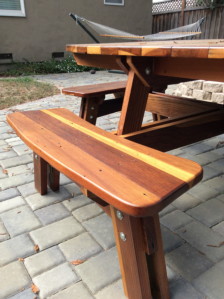
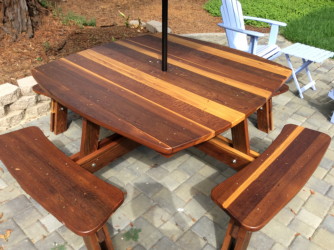
Outdoor Picnic Table
Time of build: 2015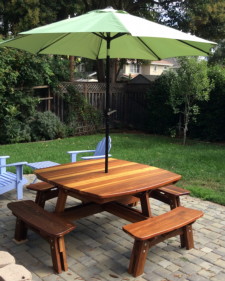
Built for: The Family!
Wood used: Repurposed from redwood deck
Description: This one took quite some time! We
started by pulling up an old deck in our backyard and
storing the wood along the side of the house. The wood sat
for quite some time and then with the help or my jointer and
my dad's planer, we were able to get the wood to a point it
was usable for a project like this. I got the plan from a
Wood Magazine and I think it really came together
nicely. My wife arranged the top boards so the
color/grain made a nice pattern. The finish is a combination
of Linseed oil, Spar Urethane, and Mineral Spirits (varying
amounts depending on the coat). I like how things came
together, although it definitely took longer than I
thought. This big project was a bit unwieldy to work
on in the garage but I am very glad it is now in our
backyard and available for use!

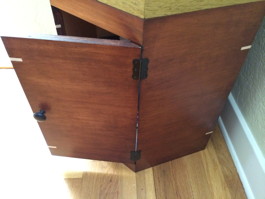
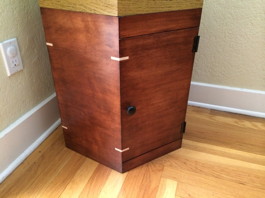
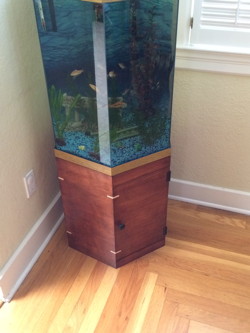
Hexagonal Fish
Tank Stand
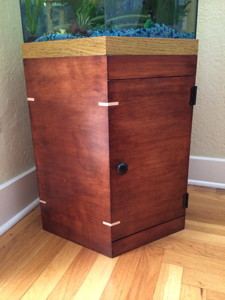
Time of build:
early 2014
Built for: The Fish...
Wood used: Leftover plywood
Description: We had an old fish tank from Jenny's
childhood and were looking to upgrade. Luckily my
brother and I had given my mom a fish tank to grow orchids
when we were young and she didn't want it anymore. We
repurposed her "orchidarium," but we needed a stand for the
hexagonal tank. This custom design is fairly simple
and matched the base of the fishtank. I did practice all the
miter cuts on a smaller version to get the angles just
right. I made one of the sides into a door and I think it
came together fairly nicely. I used a dark stain (not the
Java...something slightly lighter that I don't remember the
name of). As a bit of a decorative touch (and because Jenny
kept saying the stand needed to be strong and not fall
apart...), I added two maple splines to each of the miter
joints. The splines extend to one side door and
"match" up when the door is closed. A fun project!
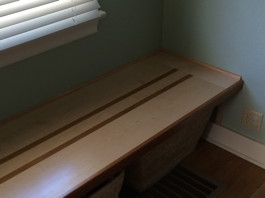
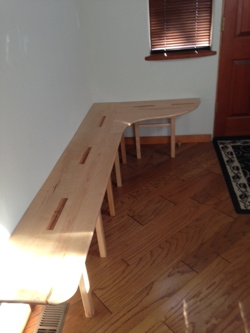
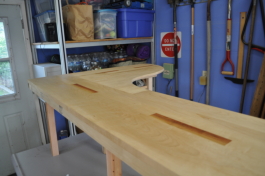
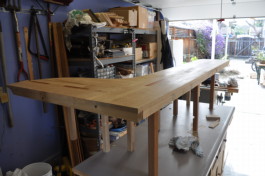
Indoor Bench II
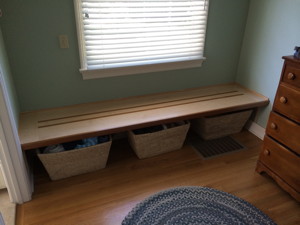
Time of build: mid
2013
Built for: My Wife
Wood used: Cherry and Maple
Description: The Shaver Bench was my
downfall. Jenny liked it too much and wanted me to
make something similar for our master bedroom...with a few
modifications). First she wanted it to look nice(r).
Second she wanted it to be able to have storage for large
containers underneath. Third she wanted it to look nice. I
liked the look of the two contrasting woods with the Shaver
Bench, but wanted to do something a little cleaner (not sure
what I mean by this...but this was a thought going through
my head). I decided on Maple and Cherry, as I had good
success with those woods when I built the cradle. I measured
out the bench requirements and first found out that all my
13/16" Maple was too short. I could either get fancy, or buy
more wood. Being cheap, I decided to 'bookend' the
center of the bench with maple running with perpendicular
grain. The end product looked pretty good, but getting
the glue up to look as good as I wanted was not trivial.
From the Shaver Bench experience, I decided I didn't want to ad-hoc the bottom structure, so I built the whole thing on a piece of sturdy plywood. I added an extra deep cherry lip to the front so it looks like the solid wood I used for the bench top is thicker than it really is. Instead of using the jointer, I just cut all the pieces on the table saw. That saved time and still made the glue-ups line up.
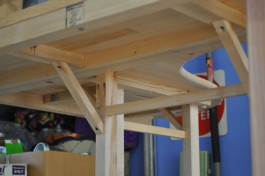
I am proud of the supporting structure underneath the
bench. I originally planned on bracing the bench on
three sides and only putting a backer on each wall the bench
would rest against. This way the bench wouldn't have
any legs and Jenny could have all the storage space she
wanted. Unfortuantely, once we put the bench on the backers,
it looked good, but there was a substantial deflection of
~1/8" in the center front when we sat on it. The whole thing
didn't feel sturdy. So, with the help of my Dad, we build
some supporting struts that we connected to the front of the
bench that extended at an angle and connected to the back
wall. After tightening some things down, the bench
feels solid, has a clean look, and Jenny has her storage
space. I finished the whole thing with water-based poly
applied using my Harbor Frieght HVLP sprayer my Dad got for
me as a gift.
Indoor Bench (Shaver)
Time of build:
early 2013
Built for: My Mom
Wood used: 13/16" maple (assorted widths I usually
get from Southern Lumber), random cedar from a tree my
parents cut down in Shaver, more maple for the legs
Description: This project took awhile to get off
the ground. It started because my mom wanted to have a
different bench in their Shaver Lake home. After some
drinking, I said I could make a bench if they gave us their
old bench (cast iron sides with wood slats). It seemed like
a good trade as we got a bench right away! My Mom laid
out the rough shape she wanted the bench to have in the
foyer area and she taped and cut out some newspapers so I
could take that rough shape home.
I designed the entire thing from the rough shape, building
the top first. I wanted to try something new, so I decided
to incorporate some of the cedar logs my parents had given
me from a tree they cut down into the bench. I settled
on making 1.5" x 8" blocks that I incorporated in the glue
up of the top. The top was done in two separate pieces, the
long ~8' part and the shorter ~3' curved part. I used the
jointer 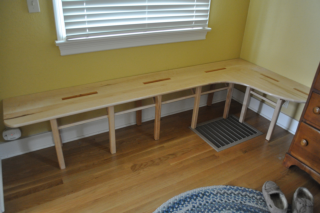 to get all the edges of the individual glue
ups nice and flush (some hand work here and there). To get
the two glued up pieces together, I clamped them down and
used the router to cut them simutaneously in one pass. This
was not easy, but the different orientation of the wood did
end up gluing up ok. I probably over-built the legs and
support structure, but I didn't want it to fall apart. The
picture to the left is the bench in the master bed room at
home...Jenny wanted to see how a bench would look there and
whether or not I should be making something for our home
(that was the start of the Indoor Bench II project). The
bench was finished with water-based polyurethane (probably
could have put more on than I did).
to get all the edges of the individual glue
ups nice and flush (some hand work here and there). To get
the two glued up pieces together, I clamped them down and
used the router to cut them simutaneously in one pass. This
was not easy, but the different orientation of the wood did
end up gluing up ok. I probably over-built the legs and
support structure, but I didn't want it to fall apart. The
picture to the left is the bench in the master bed room at
home...Jenny wanted to see how a bench would look there and
whether or not I should be making something for our home
(that was the start of the Indoor Bench II project). The
bench was finished with water-based polyurethane (probably
could have put more on than I did).
Overall I am pleased with how it turned out. Once again I learned a lot (probably mostly forgotten now). It was great to incorporate some lumber from a tree my parents cut down and the low profile of the bench is exactly what my Mom wanted. Fun project...now that it is done.
Some pictures from when I just put the bench together in
the garage...
Wood Storage - Garage
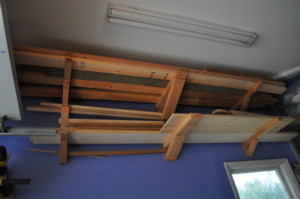
Time of build: ??
not sure
Built for: The Garage
Wood used: Leftovers
Description: I needed a place to store some wood
in the garage. Floor space is at a premium so I
decided to build some overhead wood storage. As
always, this project is probably over built...but I didn't
want any wood crashing down onto my head! It works
really well and I can use either my ladder or the worktable
on wheels to easily get access. Now I have no problem buying
the "cheap" 13/16" maple at Southern Lumber and storing it
myself so I can start a project with it any time.
Seder Plate Box
Time of build: mid
2012
Built for: The Seder Plate
Wood used: Poplar
Description: Jenny and I got a Seder plate on our
visit to Turkey. Jenny wanted me to make a box so the plate
would be safe. Unfortunately, the box if functional but
didn't turn out as nice as I wanted. I built a finger joint
jig for the router
to construct this box and that worked fairly well. The
finger joints came together nicely (maybe a little tight to
start), and I was generally pleased with the look of the box
I designed. However, staining once again was an issue.
The first go around I decided to use an old stain that I had
lying around. It turned the nice box into a blotchy
mess. UGH!! Why do I do this?!! We used the box
for awhile, but every time I looked at it I was ashamed. I
got fed up and resanded it a bit and tried to salvage the
look of the Seder box with a darker stain (the General
Finishes Java). It improved the look quite a bit...not as
good as I would like, but now good enough where I don't
cringe everytime I look at it. Lesson learned....at least
until I want to finish off an old can of stain on a "side"
project.
for the router
to construct this box and that worked fairly well. The
finger joints came together nicely (maybe a little tight to
start), and I was generally pleased with the look of the box
I designed. However, staining once again was an issue.
The first go around I decided to use an old stain that I had
lying around. It turned the nice box into a blotchy
mess. UGH!! Why do I do this?!! We used the box
for awhile, but every time I looked at it I was ashamed. I
got fed up and resanded it a bit and tried to salvage the
look of the Seder box with a darker stain (the General
Finishes Java). It improved the look quite a bit...not as
good as I would like, but now good enough where I don't
cringe everytime I look at it. Lesson learned....at least
until I want to finish off an old can of stain on a "side"
project.
Knife Block - add on
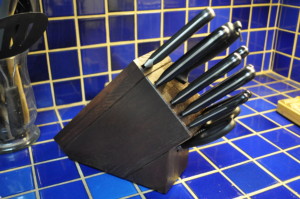
Time of build: mid
2012
Built for: The Kitchen
Wood used: Poplar
Description: Jenny gave me a fancy knife for my
birthday in 2011 (it took awhile to get around to this
project). We were happy with our current knife set and
wanted an easier way to store the new knife. I
extended the knife block with a new slot on the top. To get
all the wood to match, I restained the entire knife block
using the General Finish - Java stain I saw as being
recommended from some wood working show or magazine.
It turned out great and we are still using the knife block
today!
Mail Holder

Time of build: mid
2012
Built for: Mail Storage
Wood used: Poplar
Description: Our mail kept piling up on the
kitchen table and we didn't have a great place to store
bills that we didn't want to pay right away. I
designed this simple mail holder so we could put it on a
counter/desk and keep our mail organized. There is a
slot for me, Jenny, bills and mail waiting to be sorted. Fun
project as I got to use the router to make most of the
joinery. No screws or nails, just glue. I took a couple of
pictures while the project was unassembled so I could
remember the joints I used.
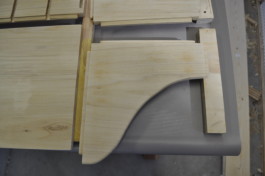
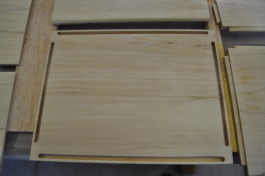
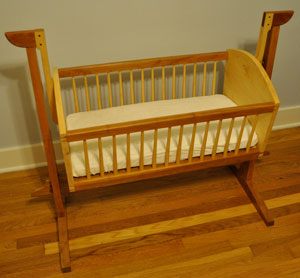
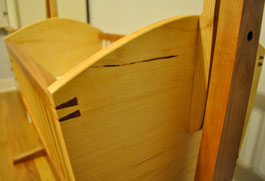
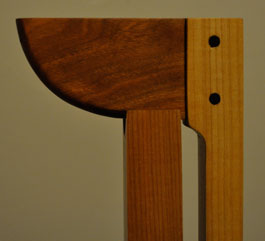
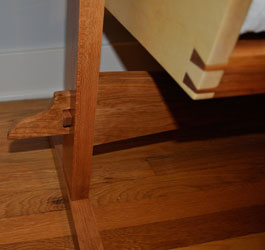
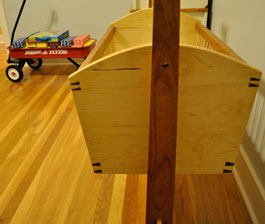
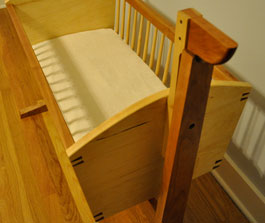
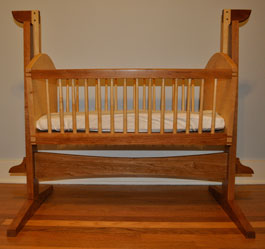
Baby Cradle
 Time of build: Late 2011, early
2012
Time of build: Late 2011, early
2012
Built for: My Son
Wood used: Maple and Cherry, Walnut pins
Description: This was truly a labor of love.
I am not sure if all new expecting parents go through this,
but once we knew about Nathan, I really started fixing (or
learning to fix) things around the house. I believe this is
why all Dads know how to fix things...because they do so
much of it before their children are born. I also wanted to
build something for Nathan an Jenny suggested a cradle. The
sides and bottom are made from 13/16" maple boards (assorted
widths) that I got from Southern Lumber. The maple was
surfaced on two sides and had one clean edge. I like the
clean look of maple and getting the wood this way makes it a
lot cheaper. I found this plan (not sure
from where) and really liked the look of it and that the
cradle easily swung back and forth. The dovetails are cut by
hand (they are hard and I need to get better at cutting
those). I really worried I would mess up the workpieces
badly, but after practicing a few times on some blanks, I
think they turned out well. I don't have a lathe, so I had
my Dad turn all the spindles (Thanks Dad!). Nathan used this
cradle for the first couple months of his life, but pretty
quickly out grew it (he was a really really big baby). We
pulled it out again for Dani and she got to use it too!
Jenny now keeps the cradle in her quilt room to store yarn,
so at least it still gets some use and is not stored away in
the attic collecting dust.
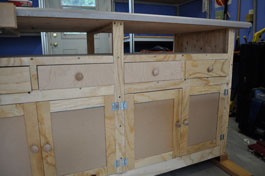
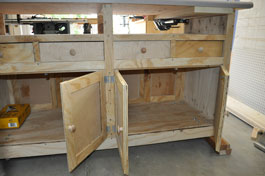
Worktable on Wheels
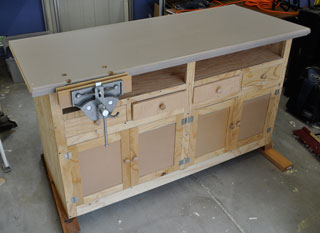
Time of build: mid
2011
Built for: Me!!
Wood used: left over 3/4" plywood, left over mdf,
craigslist-found tabletop
Description: This project was quite a bit of fun to
build. I used mostly recycled materials and now I have a
worktable on wheels that gives me quite a bit of flexability
on building things in the garage. I use it in some way or
another for large projects and small everyday fix-its. I
found the plan from a this book
I picked up at a garage sale. One of the neat things
about this build was more practice with frame and panel
doors and a really neat way to make drawer joinery using
only the table saw. I found the table top free on craigslist
for an easy laminate surface to work on. I adjusted
the plan (slightly) so I could use this table as an outfeed
table for my table saw. The drawers and cabinets also open
from both sides. I put a vise on one side which has also
come in handy. A great garage worktable!
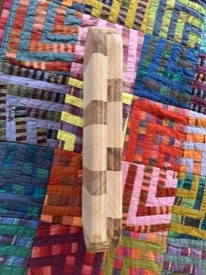
Quilt Rack
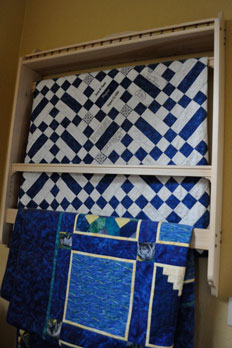
Time of build: late
2010
Built for: My Wife
Wood used: Poplar, cherry spindles, plugs and
buttons
Description: My wife is an amazing quilter.
I have spent more than my fair share of time in quilt
stores, quilt festivals, and fabric shops. She
actually presented me a quilt she had made for me on our
wedding day in front of all our guests. Only naturally I
would eventually make her something to help display her
quilts. I searched for something to make her and came across
this wall
mounted quilt rack plan. This project actually came
together fairly easily. The adjustable shelves are a nice
feature and the cherry plugs and buttons really highlight
the light color of the poplar. Some of the smaller
parts I made by hand while the decorative sides I rough cut
with a jigsaw and cleaned up by hand. Once again I used
poplar, but this time I searched through the stack to get
poplar that was uniformly lighter in color (no brown/green
spots). After the fiasco with staining, I only used a clear
top coat of polyurethane and let the wood speak for
itself. I think it turned out well and the quilt rack
is now hanging in our bedroom with several of her quilts on
display, including the quilt she gave me for our wedding
when it is too warm to use on our bed.
Router Table Extension for
Table Saw
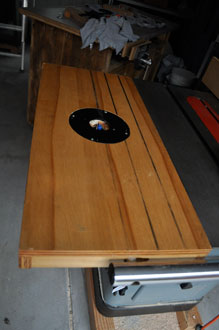
Time of build:
early 2010
Built for: Me!!
Wood used: left over 3/4" plywood from the Garage
Bench project and Game Cabinet
Description: My Dad gave me my grandfather's
router (an old craftsman) to help populate my garage with
tools. He said it was scary to use. He was right. So I
built an extension to my table saw and replaced one of the
cast iron pieces with a router extension table. It
works great. The picture to the right shows the router
extension table on my "new" Unisaw (also a Delta product),
although I originally built it for my Delta contractor table
saw (which I sold after I picked up the Unisaw from a
friend). The router extension table is great and allows me
to use the table saw fence (with another attachment I built
for routing). I recently got a nicer router (not as scary),
but I still use the router table I built. As my
garage/workshop is not very big, it has been nice to have
the table saw double up as a router table.
Game Cabinet (Shaker Storage
Cabinet)
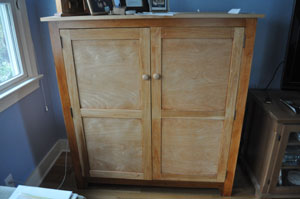
Time of build:
mid-late 2009
Built for: Inside storage
Wood used: 3/4" plywood, poplar (face frame and
doors), maple (glue-up top)
Description: Although the garage bench was my
first project, this was my first REAL project for inside our
house. I wanted to build something I could be proud of
looking at everyday and that was also functional and that we
could use everyday. I think I succeed with one of those. Our
house doesn't have much built-in storage and we were storing
all our board games out in the garage. I came across
this Shaker
Storage Cabinet article, liked the overall design, and
decided to take on the project. I had just started getting
excited about woodworking and had purchased an older Delta
Contractors table saw and wanted to test it out (after
spending quite a bit of time tuning it up). Almost all
the cuts and joi nery for this project were done on the table
saw. This project taugh me quite a few things...mostly what
not to do. I learned about glue-ups, frame and panel doors,
face frames, and staining (errrr...staining!!). As I was
just starting out, this project was a nice introduction to
using hardwoods (poplar is nice and cheap). As you will
notice, in the original article, the cabinet is painted. In
my infinite wisdom, I decided to try and stain my cabinet (I
like the look of wood grain and thought my cabinet w
nery for this project were done on the table
saw. This project taugh me quite a few things...mostly what
not to do. I learned about glue-ups, frame and panel doors,
face frames, and staining (errrr...staining!!). As I was
just starting out, this project was a nice introduction to
using hardwoods (poplar is nice and cheap). As you will
notice, in the original article, the cabinet is painted. In
my infinite wisdom, I decided to try and stain my cabinet (I
like the look of wood grain and thought my cabinet w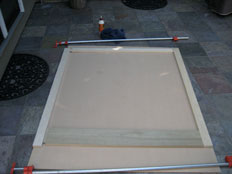 ould have a cleaner look not being
painted). I was very happy with the final construction and I
was even excited enough to take a few pictures of the
mortise and tenon joinery I used when making the face frame
along the way. However, I definitely jumped too fast into
the staining. I decided to use an all-in-one stain and
sealer. I applied it to the frame and panel doors first and
after letting it dry, realized it was ugly. I spent
quite a bit of time sanding it back down and tried again. I
used a different all-in-one stain and sealer, but didn't get
much better results. By this time, I was pretty fed up with
the project and was too tired of sanding. I still don't like
the look of the blotchy stain, but we use the cabinet
everyday and it is quite functional. From this experience, I
now believe at least as much time should be spent preparing,
staining, and applying a top coat as cutting and buildin
ould have a cleaner look not being
painted). I was very happy with the final construction and I
was even excited enough to take a few pictures of the
mortise and tenon joinery I used when making the face frame
along the way. However, I definitely jumped too fast into
the staining. I decided to use an all-in-one stain and
sealer. I applied it to the frame and panel doors first and
after letting it dry, realized it was ugly. I spent
quite a bit of time sanding it back down and tried again. I
used a different all-in-one stain and sealer, but didn't get
much better results. By this time, I was pretty fed up with
the project and was too tired of sanding. I still don't like
the look of the blotchy stain, but we use the cabinet
everyday and it is quite functional. From this experience, I
now believe at least as much time should be spent preparing,
staining, and applying a top coat as cutting and buildin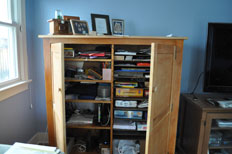 g. I also have learned to really test out
the stain on some scrap pieces before jumping all-in and
regretting my decision later. I also learned that not
all hardwoods are equal and that poplar is a difficult wood
to stain and could really benefit from applying some type of
pre-conditioner. This may be one reason why the cabinet in
the original article was painted. Someday my cabinet may
move out to the garage and live its life outside as a place
to store odds and ends. For now, it remains in our
house and a reminder to me to be patient and not rush
through a project (easier said than done!).
g. I also have learned to really test out
the stain on some scrap pieces before jumping all-in and
regretting my decision later. I also learned that not
all hardwoods are equal and that poplar is a difficult wood
to stain and could really benefit from applying some type of
pre-conditioner. This may be one reason why the cabinet in
the original article was painted. Someday my cabinet may
move out to the garage and live its life outside as a place
to store odds and ends. For now, it remains in our
house and a reminder to me to be patient and not rush
through a project (easier said than done!).
UPDATE - 2013, We redid our living room and the Shaker
cabinet has made the move out to the garage. It is a nice
storage cabinet for my tools and other garage items. No hard
feelings! I am glad it lasted as long as it did
inside.
Seed Planter Boxes
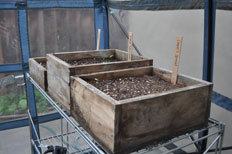
Time of build:
early 2009
Built for: My wife
Wood used: left over 3/4" plywood from the Garage
Bench project
Description: These simple planter boxes for
starting seeds were nothing special. Most of the cuts
I was able to do with my mitre saw. No fancy joinery,
just butt joints and screws. They have served us well and
several crops have been started in these small boxes. A
quick project that used some leftover wood and made my wife
happy. Happy wife = Happy life!
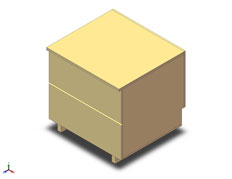
Garage Bench (my first real project)
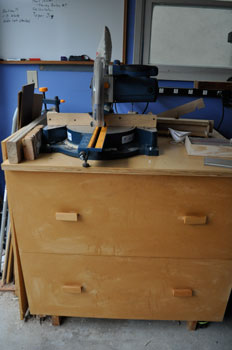
Time of build: late
2008 - early 2009
Built for: Garage storage and a place to put my
compound mitre saw
Wood used: 2x4s, 3/4" plywood, 1/4" hardwood top,
1/2" mdf drawer fronts
Description: This 2-drawer bench has oversized
drawers to fit my toolbox and other random tools. Following
my father's advice, I built this bench with enclosed drawers
to have storage protected from the sawdust that would
eventually get produced in the garage. I got to build part
of this project with my brother when he was visiting, and I
learned it is always better to have another set of hands
(e.g., Chris, hold this finishing nail while I take a whack
at it with this framing hammer...). When you don't know what
you are doing, it is also good to have someone else around
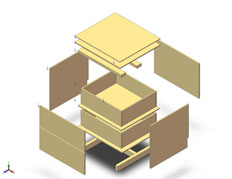
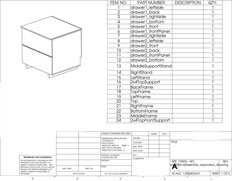
to talk some things through. I designed the bench in
Solidworks and it stayed fairly consistent with my initial
drawings. The top was sized to the mitre saw (my only real
tool at the time). While I was away at work one day,
my Dad made and installed custom drawer handles from
leftover 2x4 pieces (Thanks Dad).
Some of the original SolidWorks pics and plans:
©2020 David W. Wagner